Cranberry Muffins

I normally don’t go for muffins, but I wanted to bake something today, but didn’t want to bake something too unhealthy, so muffins it was. Most muffins are actually pretty unhealthy, but I can honestly say these are healthy. They have dried fruit, they do not use sugar (honey or agave instead), and they use whole wheat flour. So you see, they are pretty healthy, and quite tasty at that!

Ingredients:
Oven: 350 degrees
3/4 cup whole wheat flour (If you do not have WW flour, you can use 1.5 cups white flour)
3/4 cup all purpose flour
1/4 cup honey (or agave)
2 teaspoons baking powder
1/4 teaspoon salt
1 large egg, lightly beaten
2/3 cup low fat or skim milk
2 tablespoons melted butter
3/4 cup dried cranberries
zest of 1/2 lemon
Directions:
Line a muffin pan with liners or spray with nonstick spray if you do not have liners.
1- Mix the flours, baking powder and salt in a medium-large bowl.
2- In another medium bowl, whisk together the egg, milk, honey, lemon zest, and butter until well combined.
3- Pour the wet ingredients over the dry and add the cranberries and lemon zest. Fold everything together until just combined.
4- Fill muffin cups 2/3 of the way and bake for about 15 mins minutes. Check after 10 mins.
Enjoy!

Tempura

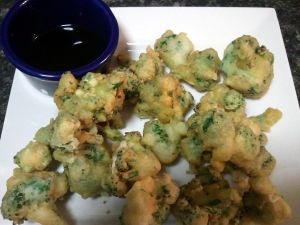
I saw this recipe on Giada at Home and thought it would be fun to try. I love vegetables. I’m usually not a fan of anything that makes something so inherently healthy unhealthy, like tempura, but sometimes you just need to indulge! Tempura is just so much fun. It’s so flavorful, especially when paired with a little soy sauce. I had some leftover broccoli to use last night and I decided to give this recipe a try as a little appetizer. The main course was a roasted chicken with turnips, radishes, carrots, and garlic roasting in the pan drippings.

I made broccoli tempura, but you can do almost any vegetable. Giada uses green beans and asparagus. For the amount of broccoli I had (see pic), I used half the recipe and it was perfect. Tempura batter doesn’t keep well, so make what you think you’ll need. Also, this recipe is MUCH easier with a deep fry or candy thermometer. You really need to get the oil to the right temperature or the vegetables will be soggy instead of crispy.

I think that’s about everything! Now just follow the link below and start making up your tempura batter!

http://www.foodnetwork.com/recipes/giada-de-laurentiis/green-bean-and-asparagus-tempura-recipe/index.html


Homemade Pierogies

Saturday afternoon I had every intention to make my homemade pierogies to freeze for a quick meal. Every intention. Really. I thought I would start them right after we took our puppy Dexter for a short walk. We get to the boardwalk for our walk and see all the people in the water and you know what happens? We turn around, sprint home, get into our wetsuits, and there goes pierogi making until another day.

So, Sunday rolls around and there’s no excuse. There’s a bad rip current and choppy waves, so I get into the kitchen and make my pierogies. And boy am I glad I did. They look so pretty! And I’ll be glad when I’m busy and need a quick meal!

I always used to make Mrs. T’s pierogies, but it’s my motto that fresh, homemade, and handmade is always better than anything boxed. Besides when you have some spare time, why not get in the kitchen and cook something fantastic that can be frozen for a later date? My freezer is packed with things like that! Sometime this week I plan on making sauerkraut as well!

The dough for this recipe is SUPER easy to work with as long as you keep it chilly. The recipe tells you to moisten the dough to create a seal, but I just used a fork to crimp the dough closed. Let’s see. I think that’s everything. Oh, this is actually a Rachael Ray recipe, which I followed semi closely. If I made any additional changes besides the one listed above, I’ll let you know below. The original recipe can be found here: http://www.rachaelraymag.com/Recipes/rachael-ray-magazine-recipe-search/dinner-recipes/holiday-pierogi-with-brown-butter

Ingredients:

  • 1 pound baking potatoes, peeled and quartered
  • 2 tablespoons butter
  • 3/4 cup shredded white cheddar cheese
  • Salt and pepper
  • 2 3/4 cups flour, plus more for dusting
  • 1 large egg
  • 2 tablespoons onion, diced (optional)
Note that the original recipe has you make a brown butter sauce for the pierogies, but since I’m freezing them, I won’t be making that here.
Directions:
1- In a small pot of boiling salted water, cook the potatoes until fork-tender, about 8 minutes. Drain and transfer to a medium bowl. Mash with 2 tablespoons butter. Stir in the cheddar cheese, onion (if using) and season with salt and pepper.
2- In a large bowl, combine the flour, 1 teaspoon salt and 1/2 teaspoon pepper. Make a well in the center of the flour, add the egg and sour cream and stir into the flour.
3- Transfer to a work surface and knead until a smooth, stiff dough forms. Cut the dough into quarters, wrap each in plastic and refrigerate for 30 minutes.
4- On a floured work surface, working with one-quarter of the dough at a time, roll out each piece. You don’t have to be be precise in rolling (you’ll see mine below!). You can always re roll leftover dough. But, if anything, make sure to roll the dough out nice and thin.
5- Using a 4-inch biscuit cutter (I used the top of a glass), cut the dough into rounds. Start with one piece of dough and keep the remaining three in the refrigerator.
See my rolling out of the dough was anything but precise! This piece looks like South America!!
6- Place a tablespoon of potato filling slightly off center on each circle. Moisten the edge, if it needs it. Otherwise just press closed and crimp with a fork.
7- In a large pot of boiling, salted
water, cook the pierogi, about 9 at a time, for 5 to 7 minutes. Or freeze as I did. I lined a gallon ziploc bag with wax paper, placed a single layer down, placed wax paper on top of the first layer, added a second layer of pierogies, and went through this one more time. I had two ziploc bags full at the end. I then placed both bags in the freezer.
Enjoy:)

Lemon Vinaigerette Dressing

I was watching an episode of Secrets of a Restaurant Chef on Food Network the other day and caught the very end of an episode where Anne made a warm arugula salad with lemon vinaigerette dressing. It looked delicious. I ended up making it tonight to go with our chicken wrapped in prosciutto. The lemony flavor juxtaposed with the peppery arugula was delicious. Heating the dressing a bit before wilting the arugula in it makes all the flavors meld together nicely too.

The ingredients presented below makes enough dressing for two large salads.

Ingredients:

1- 1/4 cup olive oil

2- 1 tsp dijon mustard

3- zest of half a lemon

4- juice of half a lemon

5- 2-3 cloves garlic, leave whole

Directions:

1- Whisk all ingredients together.

2- Heat the dressing in a pan over medium low heat until the garlic turns a light brown. Remove the garlic and discard.

3- Turn the heat to low and wilt the arugula in the dressing.

4- Serve warm with some fresh Parmigiano-Reggiano cheese and croutons.

Bulgur and Lentil Salad

This is another one of those recipes that creates leftovers. Actually this one I prepared with the sole purpose of freezing in individual portions so that we would have healthy lunches on hand to take to work. Who wants to eat the dreaded sandwich every single day? Lentils, as opposed to most other dried beans, are very easy to cook up. They boil in about 20-30 minutes, no soaking time needed. Lentils are packed with fiber and they also give you tons of energy without spiking your blood sugar, so you won’t have that crash afterward. Bulgur is also very easy to cook and has many health benefits. It’s a whole grain that is also packed with fiber. This salad will definitely help get you through the day:) This recipe makes about 6 individual portions.

About 1.5 hours before you want to start the whole recipe, start soaking the bulgur. Add all the bulgur to a bowl that has a cover, cover with water, and let soak for 1.5 hours.

Ingredients:

1- olive oil

2- 1 large onion, sliced thinly

3- 1 1/3 cup bulgur

4- 1 1/4 cup dry lentils

5- salt

6- 1/2 cup chopped mint

7- 2 tablespoons, plus 2 1/2 cup water

Directions:

1- Start making the lentils- Add the lentils to a pot and fill with water. Bring the water to a simmer and cook for about 20 minutes or until tender (you may need more cooking time). Drain when done.

2- While the lentils cook, start to caramelize the onion. Heat the oil (about 2 turns of the pan) in a skillet over high heat. Add the onions and cook stirring frequently for about 5 minutes or until the onions begin to brown. Add the 2 tbs water, reduce heat to low, and cook, stirring frequently, until the onions are golden and very soft.

3- Add back to the pot in which the lentils were cooking, the bulgur, lentils, and onions. Add the remaining 2 1/2 cups water and bring to a boil. Once boiling, reduce heat and simmer until the water is gone. Stir in the mint and some additional salt to tase.

4- If freezing, allow to cool and then divide into baggies. Put the baggies into a gallon size bag to keep everything together and label the bag. The salad should be eaten within a month of freezing.

When serving this salad, you can add some lemon juice and yogurt, if desired.

Here’s to a healthy lunch.