Smothered Onion Sauce

I know it’s been a really long time since I last posted. No excuse, really, just general laziness. Anyway, a few weeks ago, I made Marcella Hazan’s Smothered Onion Sauce. Ohhhh goodness, I didn’t know onions could be so deliciously sweet! This is an easy recipe, albeit a bit time consuming.

Ingredients:

1- 2 tablespoons butter, with
2- 2 tablespoons extra virgin olive oil
3- 1 1/2 lbs onions, sliced very thin, about 6 cups
4- salt
5- black pepper, ground fresh from the mill
6- 1/2 cup dry white wine
7- 1/3 cup freshly grated parmigiano-reggiano cheese
8- 1 -1 1/2 lb spaghetti or 1 -1 1/2 lb another pasta

Directions:

Put the butter and olive oil, and the onions with some salt in a large sauté pan. Cover and turn heat to very low. Cook for almost 45 minutes to an hour until the onions become very soft.

Uncover the pan, raise the heat to medium high, and cook the onions until they become colored a deep, dark gold. Any liquid the onions may have shed must now boil away.

Add liberal grindings of pepper. Taste and correct for salt. Bear in mind that onions become very sweet when cooked in this manner and need an adequate amount of seasoning. Add the wine, turn the heat up, and stir frequently while the wine bubbles away. Add the parsley, stir thoroughly, and take off heat.

Toss with cooked drained pasta, adding the grated Parmesan. As you toss, separate the onion strands somewhat to distribute them as much as possible throughout the pasta. Serve immediately.

Low Fat Fettuccine

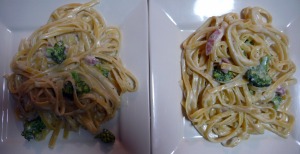
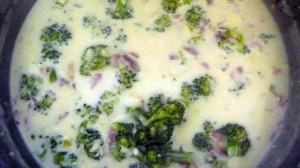
I like fettuccine, but I don’t like how how in fat it is. This is a recipe I found online, but then tweaked a bit to make it my own. I will definitely be making this quite often.

Just as a note, I also added pancetta to the sauce to add a bit of natural saltiness. Instead of adding it directly to the sauce, I think I will saute it next time separately and then add it on top of the dish at the end. I would have liked it to keep its crunchiness.

Ingredients:

  • 2 tbsp butter
  • 4 cloves garlic, minced
  • 2 tbsp flour, plus 1 tsp, if needed
  • 2 1/3 cups low fat milk
  • about 2 cups grated Parmesan cheese (I used Pecorino Romano because I like the sharp taste of it)
  • 4 tablespoons low fat cream cheese
  • Small head of broccoli, cut into small pieces
  • 1 box fettuccine
  • pepper
Directions:
1- Cook pasta according to package directions.
2- Add about an inch of water to pan and steam broccoli for about 4 minutes. Take the broccoli out and set aside. Pour the water from the pan and dry with a cloth.
3- In the same pan, melt the butter over medium heat. Add the garlic. Let the garlic flavor the oil for about three minutes. Add the broccoli.
4- Add the milk to the pan.
5- Slowly whisk in the flour.
6- Cook about 6 minutes or until thickened, stirring constantly. Add the additional tsp flour if needed.
7- Add the Parmesan and the cream cheese.
8- Toss with the pasta.

Cranberry Muffins

I normally don’t go for muffins, but I wanted to bake something today, but didn’t want to bake something too unhealthy, so muffins it was. Most muffins are actually pretty unhealthy, but I can honestly say these are healthy. They have dried fruit, they do not use sugar (honey or agave instead), and they use whole wheat flour. So you see, they are pretty healthy, and quite tasty at that!

Ingredients:
Oven: 350 degrees
3/4 cup whole wheat flour (If you do not have WW flour, you can use 1.5 cups white flour)
3/4 cup all purpose flour
1/4 cup honey (or agave)
2 teaspoons baking powder
1/4 teaspoon salt
1 large egg, lightly beaten
2/3 cup low fat or skim milk
2 tablespoons melted butter
3/4 cup dried cranberries
zest of 1/2 lemon
Directions:
Line a muffin pan with liners or spray with nonstick spray if you do not have liners.
1- Mix the flours, baking powder and salt in a medium-large bowl.
2- In another medium bowl, whisk together the egg, milk, honey, lemon zest, and butter until well combined.
3- Pour the wet ingredients over the dry and add the cranberries and lemon zest. Fold everything together until just combined.
4- Fill muffin cups 2/3 of the way and bake for about 15 mins minutes. Check after 10 mins.
Enjoy!

Tempura

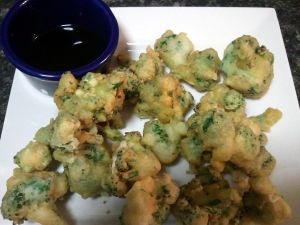
I saw this recipe on Giada at Home and thought it would be fun to try. I love vegetables. I’m usually not a fan of anything that makes something so inherently healthy unhealthy, like tempura, but sometimes you just need to indulge! Tempura is just so much fun. It’s so flavorful, especially when paired with a little soy sauce. I had some leftover broccoli to use last night and I decided to give this recipe a try as a little appetizer. The main course was a roasted chicken with turnips, radishes, carrots, and garlic roasting in the pan drippings.

I made broccoli tempura, but you can do almost any vegetable. Giada uses green beans and asparagus. For the amount of broccoli I had (see pic), I used half the recipe and it was perfect. Tempura batter doesn’t keep well, so make what you think you’ll need. Also, this recipe is MUCH easier with a deep fry or candy thermometer. You really need to get the oil to the right temperature or the vegetables will be soggy instead of crispy.

I think that’s about everything! Now just follow the link below and start making up your tempura batter!

http://www.foodnetwork.com/recipes/giada-de-laurentiis/green-bean-and-asparagus-tempura-recipe/index.html


Cabbage with Sausage

I made this dish tonight to go with my frozen homemade pierogies (http://wp.me/p1S4sU-2V). I wish I was able to find kielbasa because that would have made it truly Polish style, but, alas, all’s I was able to find at my grocery store was Italian sausage. Oh well. Maybe the butcher about 3 miles away has it. You might be wondering why I didn’t just go to the butcher to begin with since it is that close. Well A) the grocery store is right across the street and B) our car is getting repaired. It’s a brand new car and already it needs a new part. An air condition compressor. Whatever that is. According to the guy at Bay Ridge Honda, the fact that we need this part is just bad luck. I could have taken the Q22 bus (that’s a Queens bus) up Rockaway Beach Boulevard, but that’s so slow and my kielbasa would have gotten warm. So now you see why I ended up at the grocery store with my Italian sausage.

When making this dish, I used a medium cabbage and oh goodness gracious did it cook down. I knew it would a little, but it surprised me that it cooked down as much as it did. So I suggest getting a big head of cabbage. Also, I used turkey bacon, but feel free to use pork bacon of course!

So here are the ingredients:

1- Cabbage, cut into small strips

2- 6 pieces of bacon, cooked and chopped into bits

3- 1 lb kielbasa (or sausage!) cut into small pieces.

4- 1/4 cup water

5- 2 tbs brown suger

5- A little salt and a little pepper

All my ingredients prepped and read to go!

Directions:

1- Add the 1/4 cup water to a pan, the cabbage, brown sugar, salt, and pepper. Let cook for about 10 minutes.

2- Add the kielbasa or sausage to the pan and cook until the kielbasa or sausage is cooked through and browned. You can cook longer if you want the cabbage nice and caramelized.

3- Add the bacon bits when ready to serve. If you refrigerated the cabbage mixture, heat up the bacon bits for about 10 seconds before serving.

Serve with your homemade pierogies, just like I did for dinner tonight!

Semi Homemade Four Layer Lasagna

Well, maybe I should be more accurate. This is more than semi homemade. We made the noodles and the sauce by hand, but we cheated and instead of making a white sauce and using fresh Parmigiano Reggiano, we used ricotta and Sargento shredded cheese.

I think homemade noodles hold up SO much better than boxed noodles. Homemade noodles don’t get mushy in the oven. It’s a little more effort, but with all the leftovers lasagna usually makes, you’ll end up saving time by not having to make dinners the next few days:) And if you’re making the homemade noodles, you might as well make a homemade sauce because while the sauce simmers, you can make the noodles!

The noodle recipe is from Marcella Hazan. I have that memorized by now. And the sauce recipe is also from Marcella. One time we made her Lasagna with Bolognese Sauce (https://the365cook.wordpress.com/2011/09/20/homemade-lasagna), but this time I just took a sauce recipe from her book that looked like it would fit well in the lasagna. I used my Dutch Oven to layer up the lasagna because my regular lasagna pan doesn’t allow as many layers as I wanted.

So, finally, here are the steps and ingredients:

Ingredients:

For the sauce:

1- 5 tbs butter
2- 6 tbs each onion, carrot, and celery, finely chopped
3- 29 oz can San Marzano tomatoes plus two small fresh tomatoes chopped (because one can isn’t quite enough)
4- salt

And about a lb of ground turkey or beef to be cooked separately and added to the sauce later.

For the noodles:

1- 2 cups unbleached flour
2- 4 egg
3- Pasta machine

For the ricotta mixture:

1- 30 oz ricotta
2- 1 egg
4- 3/4 cup shredded cheese

Directions:

Start the sauce first:

1- Place all ingredients into a pot and cook, uncovered, at a very low simmer, for 45 minutes. Stir occasionally.

2- Brown the meat and then set aside.

While the sauce simmers, work on the noodles:

1- Put the flour on a clean work surface. Make a well and add the eggs. Use a fork to break up the egg and to incorporate the flour. Use only as much flour as you need to make a dough. Add more if needed. The eggs I use are always super absorbent, so I always need more flour.

2- Once the dough has come together and is no longer sticky, knead for a full 8 minutes.

3- Cut the dough in to about 10 small manageable pieces and start putting through the pasta roller. Start at 7 and work your way down to 4 putting the dough through twice on each number. Once rolled out, place on a kitchen towel. If the pieces are long, you can cut into a more manageable size.

Somewhere in the midst of this, start boiling a pot of water and have an ice bath prepared.

4- Once the noodles are cut, add them to the pot of boiling, salted water. Allow the water to come back to a boil and boil, literally, for about 30 seconds. Remove and plunge into the ice bath. Take them out and run them under cold water to remove excess starch. Lay on a kitchen towel.

For the ricotta mixture:

1- Mix the egg, ricotta, and cheese together. Easy.

Now preheat the oven to 400 degrees

Add the browned meat to the sauce and stir to combine. Begin to build the lasagna.

Layer of sauce, noodles, ricotta, sauce, noodles, ricotta, sauce, etc. If you have extra noodles, you can cut into strips of pasta and save for later.

Bake at 400 for 15 minutes. Check after 10 minutes to see if a crust has formed. If not, boost up 50-75 degrees and bake another 10 minutes. Do not bake more than 15 minutes is what Marcella Hazan says.

Let cool and enjoy. And of course you know lasagna is always better the second day:) We just had it for dinner last night and I put the rest in the freezer.
Homemade Pierogies

Saturday afternoon I had every intention to make my homemade pierogies to freeze for a quick meal. Every intention. Really. I thought I would start them right after we took our puppy Dexter for a short walk. We get to the boardwalk for our walk and see all the people in the water and you know what happens? We turn around, sprint home, get into our wetsuits, and there goes pierogi making until another day.

So, Sunday rolls around and there’s no excuse. There’s a bad rip current and choppy waves, so I get into the kitchen and make my pierogies. And boy am I glad I did. They look so pretty! And I’ll be glad when I’m busy and need a quick meal!

I always used to make Mrs. T’s pierogies, but it’s my motto that fresh, homemade, and handmade is always better than anything boxed. Besides when you have some spare time, why not get in the kitchen and cook something fantastic that can be frozen for a later date? My freezer is packed with things like that! Sometime this week I plan on making sauerkraut as well!

The dough for this recipe is SUPER easy to work with as long as you keep it chilly. The recipe tells you to moisten the dough to create a seal, but I just used a fork to crimp the dough closed. Let’s see. I think that’s everything. Oh, this is actually a Rachael Ray recipe, which I followed semi closely. If I made any additional changes besides the one listed above, I’ll let you know below. The original recipe can be found here: http://www.rachaelraymag.com/Recipes/rachael-ray-magazine-recipe-search/dinner-recipes/holiday-pierogi-with-brown-butter

Ingredients:

  • 1 pound baking potatoes, peeled and quartered
  • 2 tablespoons butter
  • 3/4 cup shredded white cheddar cheese
  • Salt and pepper
  • 2 3/4 cups flour, plus more for dusting
  • 1 large egg
  • 2 tablespoons onion, diced (optional)
Note that the original recipe has you make a brown butter sauce for the pierogies, but since I’m freezing them, I won’t be making that here.
Directions:
1- In a small pot of boiling salted water, cook the potatoes until fork-tender, about 8 minutes. Drain and transfer to a medium bowl. Mash with 2 tablespoons butter. Stir in the cheddar cheese, onion (if using) and season with salt and pepper.
2- In a large bowl, combine the flour, 1 teaspoon salt and 1/2 teaspoon pepper. Make a well in the center of the flour, add the egg and sour cream and stir into the flour.
3- Transfer to a work surface and knead until a smooth, stiff dough forms. Cut the dough into quarters, wrap each in plastic and refrigerate for 30 minutes.
4- On a floured work surface, working with one-quarter of the dough at a time, roll out each piece. You don’t have to be be precise in rolling (you’ll see mine below!). You can always re roll leftover dough. But, if anything, make sure to roll the dough out nice and thin.
5- Using a 4-inch biscuit cutter (I used the top of a glass), cut the dough into rounds. Start with one piece of dough and keep the remaining three in the refrigerator.
See my rolling out of the dough was anything but precise! This piece looks like South America!!
6- Place a tablespoon of potato filling slightly off center on each circle. Moisten the edge, if it needs it. Otherwise just press closed and crimp with a fork.
7- In a large pot of boiling, salted
water, cook the pierogi, about 9 at a time, for 5 to 7 minutes. Or freeze as I did. I lined a gallon ziploc bag with wax paper, placed a single layer down, placed wax paper on top of the first layer, added a second layer of pierogies, and went through this one more time. I had two ziploc bags full at the end. I then placed both bags in the freezer.
Enjoy:)

Sauteed Peas with Prosciutto

We always have a vegetable with dinner, always. Whether it be a quick salad, frozen steam in the bag Brussels Sprouts (which are REALLY good, by the way), or yummy roasted carrots. We always have something. Anyway, this half used bag of frozen peas has been sitting in the freezer for a while now so one night last week when thinking about what vegetable to serve with dinner, I remembered that bag. Now what in the world to do with frozen peas? Steam them and add some butter? No, too boring. Hmmm Let’s just see if my good friend Marcella Hazan has anything to say about peas. And you know what? Of course she did. Why was I surprised? That lady knows everything. I skimmed the ingredient list and realized I had everything home except the prosciutto. Luckily the grocery store is right across the street and they have that computer kiosk at the deli, so all’s I had to do was put my order in the machine and wait for the deli counter person to slice it and put it in the refrigerated collection area. Minimal human interaction. Sounds pretty good to me. Sometimes I’m too tired and just don’t feel like talking to people. Anyway, I get home and start making my peas not following the recipe at all really. Marcella just gave me the ingredient ideas, I implemented on my own and it came out quite well! I think Marcella and I work well as a team 🙂

Here are the ingredients with quantities listed for a half bag of frozen peas. Really just make everything proportionate and you should be fine.

1- frozen peas

2- 2-3 slices prosciutto, sliced into pieces

3- 2-3 cloves garlic, whole

4- olive oil, about 2 turns of the pan

5- salt and pepper

Directions:

1- Add the olive oil to the skillet over medium high heat and add the garlic to the pan. Allow the garlic to flavor the olive oil for a few mins. The garlic should turn a golden color. After this has happened, remove the garlic.

2- Add the sliced prosciutto to the pan and quickly stir to coat with the olive oil.

3- Add the peas and the salt and pepper. Turn the heat down to low and cover the pan. Cook until the peas are done (about 3-5 mins).

4- Pile high in a pretty bowl and enjoy.

Lemon Vinaigerette Dressing

I was watching an episode of Secrets of a Restaurant Chef on Food Network the other day and caught the very end of an episode where Anne made a warm arugula salad with lemon vinaigerette dressing. It looked delicious. I ended up making it tonight to go with our chicken wrapped in prosciutto. The lemony flavor juxtaposed with the peppery arugula was delicious. Heating the dressing a bit before wilting the arugula in it makes all the flavors meld together nicely too.

The ingredients presented below makes enough dressing for two large salads.

Ingredients:

1- 1/4 cup olive oil

2- 1 tsp dijon mustard

3- zest of half a lemon

4- juice of half a lemon

5- 2-3 cloves garlic, leave whole

Directions:

1- Whisk all ingredients together.

2- Heat the dressing in a pan over medium low heat until the garlic turns a light brown. Remove the garlic and discard.

3- Turn the heat to low and wilt the arugula in the dressing.

4- Serve warm with some fresh Parmigiano-Reggiano cheese and croutons.

Vino Con Brio Estate Matzin Old Vine Zinfandel, 2006, Lodi, California

Vino Con Brio Winery offered roughly 5000 cases of 15 different varietals in 2011. Owned and operated by the Matson Family in Lodi, California, Vino Con Brio’s Matzin Old Vine Zinfandel is an estate grown red that has been highly rated by the likes of Wine Spectator and others for the spectacular juice that is produced by the 66 year old vines.

The 2006 bottling was the Matson’s eighth vintage and offers gentle blackberry and green pepper aromas. These open to supple plum and currant flavors. An edge of spice and acidity frame its fleshy fruit. This Old Vine Zinfandel’s finish is long lasting, with haunting cherry notes.

The Matson Family recently retired from wine making in June of 2011, selling the vineyards to Mettler Family Vineyards. Their wines are still widely available, and are excellent for pairing with pizza, turkey, and good friends.